How to Heat Press DTF Transfers: Step-by-Step Guide
So you've got your DTF transfers in hand — and now you're staring at your heat press wondering exactly what to dial in. Don't worry. Whether this is your first time or you're troubleshooting a tricky fabric, this guide walks you through the complete process: the right temperature, the right time, the right pressure, and how to peel without ruining your work.
DTF (Direct to Film) transfers have made professional-quality garment decoration incredibly accessible. But the application step is where things can go sideways — usually because of heat press settings that are just slightly off. We've seen it all: transfers that won't stick, edges that peel, colors that shift, prints that crack after the first wash. Almost every one of those problems has a simple fix. Let's get into it.
If you're brand new to DTF and want a quick primer on how the technology works before diving into application, check out our what is DTF printing guide first — then come back here for the hands-on process.
Equipment You Need
The good news: heat pressing DTF transfers doesn't require expensive or complicated equipment. Here's what you need before you start:
- Heat press machine — A clamshell or swing-away press works great. Even an entry-level model ($200–$400) delivers consistent results. The key is even platen coverage and reliable temperature accuracy.
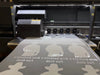
- DTF transfers — Printed on film with a hot-melt adhesive powder applied to the ink layer. (That's what bonds the design to your fabric.)
- Blank garment — Cotton, polyester, blends, nylon — DTF works on virtually any fabric. More on fabric-specific settings later.
- Parchment paper or a silicone sheet — Used as a cover sheet during pressing to protect the transfer and distribute heat evenly. Parchment paper (the kind from the grocery store) works perfectly.
- Heat-resistant tape (optional) — Keeps your transfer from shifting during positioning, especially helpful for oddly shaped placements.
- Ruler or T-square (optional) — For precise centering, especially on chest prints.
Quick Note
A regular household iron is not a substitute for a heat press. Irons heat unevenly and can't hold consistent pressure — both of which are essential for proper DTF adhesion. Invest in even a basic heat press and you'll get significantly better results.
Need transfers? Here at Zizo DTF, we offer individual DTF transfers in 17+ sizes with no minimum order — so you can test a single design before committing to a full run. We also carry DTF gang sheets if you're working with multiple designs and want to maximize your cost per print.
Step 1: Pre-Press Your Garment
1
Before the transfer goes anywhere near the garment, pre-press it. Place the blank garment on the heat press platen, close the press, and apply heat for 3–5 seconds at around 300°F with medium pressure.
This short pre-press does two important things:
- Removes moisture — Even freshly washed or newly packaged garments carry moisture in the fibers. That moisture creates steam during your main press, which can prevent the adhesive from bonding properly and cause bubbling or lifting edges.
- Smooths out wrinkles — DTF transfers need a flat, wrinkle-free surface for even adhesion. A pre-press flattens the fabric perfectly.
Open the press and let the garment breathe for a few seconds before laying down your transfer. You want the fabric warm — not steaming.
Pro Tip
For thick garments like hoodies or sweatshirts, use a pressing pillow (or a folded towel) inside the garment during pre-pressing. This keeps the platen surface level and prevents seams and zippers from creating uneven pressure during your main press.
Step 2: Position Your Transfer
2
Place the DTF transfer ink-side down (the printed side faces the fabric — not you). The clear backing film should be facing up.
Take your time here. Once the press closes, repositioning is not an option. For a standard chest print on a T-shirt, a common placement guide is:
- Centered horizontally — Measure from both side seams and find the midpoint.
- 3–4 inches below the collar — This is the industry standard for chest placement. Measure from the base of the collar, not the top of the shoulder.
Once the transfer is positioned, lay your parchment paper or silicone sheet over the top. This cover sheet protects the backing film from direct contact with the platen and helps distribute heat evenly across the entire transfer surface. If you skip the cover sheet, you risk scorching the film or creating hot spots that overheat the adhesive.
Pro Tip
For smaller or oddly shaped transfers — patches, sleeve prints, pocket logos — use a small piece of heat-resistant tape on the corners to hold the transfer in place while you position the cover sheet. Just avoid taping over the design itself.
Step 3: Set Temperature and Time
3
This is where most application problems originate — not from the transfers themselves, but from heat press settings that are slightly off. Here are the standard settings for DTF transfers:
- Temperature: 300–320°F (149–160°C)
- Time: 12–15 seconds
- Pressure: Medium-firm
"Medium-firm" pressure means you should feel noticeable resistance when closing the press, but you shouldn't be forcing it shut. If your press has a pressure dial, start at 40–60 PSI and adjust from there. Under-pressure leads to poor adhesion; over-pressure can squeeze the adhesive out from under the design edges.
Important
Always use a timer — don't eyeball your press time. Even a few extra seconds at high heat can cause color shifting on heat-sensitive fabrics like polyester and nylon. Your phone's stopwatch works perfectly.
The settings above are a strong starting baseline, but your ideal settings will shift based on fabric. See the Settings by Fabric Type section below for specific numbers per material.
Step 4: Press and Peel
4
Close the press with steady, even pressure. Keep it closed for the full press time — don't lift the handle partway through to check. When the timer goes off, open the press and remove the cover sheet.
Now it's time to peel the backing film. DTF transfers fall into two categories:
- Hot peel — Remove the film immediately after pressing while the transfer is still warm. Most DTF transfers are hot peel. Grab one corner of the film and peel it back slowly and steadily at a low angle — think peeling a sticker, not yanking a bandage. If the film resists or the design pulls with it, close the press for another 2–3 seconds and try again.
- Cold peel — Let the garment cool for 15–20 seconds before removing the film. Cold peel transfers typically produce a slightly softer hand feel. If you're unsure which type you have, check the instructions that came with your transfers — or test one on scrap fabric first.
After peeling, take a look at the transfer. The edges should be fully adhered with no lifting. The colors should be vibrant and the lines clean. If everything looks good, you're done — or you can do an optional second press.
Optional Second Press
For extra durability and a smoother finish, many decorators do a second press after peeling. Place a clean sheet of parchment paper over the now-applied design and press again for 5–10 seconds at the same temperature. This second press helps bond any micro-edges that didn't fully adhere and gives the print a slightly more finished look. It's especially useful for designs with fine lines or very small text.
And that's the full application process. Four steps, maybe 5–8 minutes total once you have your settings dialed in. Want to make sure your prints hold up long-term? Check out our aftercare tips for DTF prints — proper washing and storage make a big difference in print longevity.
Ready to Try It Yourself?
Get a free sample pack from Zizo DTF and test our transfers on your own heat press — no commitment, no minimum order required.
Request Your Free Sample PackOr browse our full transfer collection
Settings by Fabric Type
The standard settings (300–320°F, 12–15 seconds, medium-firm pressure) work well for most cotton garments. But once you start pressing polyester, blends, or performance fabrics, you need to dial things back — especially on temperature. Here's exactly what to use for each fabric type.
| Fabric Type | Temperature | Press Time | Pressure | Peel |
|---|---|---|---|---|
| 100% Cotton | 315°F (157°C) | 15 seconds | Medium-firm | Hot peel |
| 100% Polyester | 285°F (141°C) | 10 seconds | Medium | Hot or cold peel |
| Cotton-Poly Blend | 300°F (149°C) | 12 seconds | Medium-firm | Hot peel |
| Nylon | 275°F (135°C) | 8–10 seconds | Light-medium | Cold peel |
Settings are recommended starting points. Test on a sample piece before production runs — actual results vary by brand, fabric weight, and heat press calibration.
Cotton Settings
Cotton is the most forgiving fabric for DTF transfers — and the most common. It tolerates higher heat and longer press times without scorching, which is why it gets the full 315°F / 15-second treatment. The adhesive bonds deeply into the cotton fibers at this temperature, which is a big part of why cotton prints tend to hold up so well through repeated washing.
For heavyweight cotton (like thick fleece hoodies or 14 oz canvas), you may want to add 1–2 seconds to your press time since the extra material mass absorbs more heat. Use a pressing pillow to keep the platen level across thick seams.
Polyester Settings
Polyester is the fabric that trips up most beginners — and for good reason. Synthetic fibers are heat-sensitive, and pressing polyester too hot causes dye migration — a phenomenon where the garment's dye bleeds up into your transfer and permanently tints the colors. On a black poly shirt, you might see a brownish or yellowish haze appear through lighter colors in your design. Once it happens, it can't be reversed.
Drop to 285°F and shorten your press time to 10 seconds for polyester. You may also want to use a pressing sheet between the platen and the garment (in addition to the cover sheet on top) for extra heat buffering. If your design still shows dye migration at 285°F, try 275°F — and consider using a bleed-blocking transfer if you're regularly pressing bright-colored poly garments.
Watch Out
Athletic wear, performance jerseys, and moisture-wicking fabrics are almost always polyester or high-poly blends. Always check the care label before pressing — if it says "low heat" or "no iron," treat it like a delicate polyester and go conservative on your settings.
Cotton-Poly Blend Settings
Blended fabrics — typically 50/50, 60/40, or 65/35 cotton-poly — are incredibly common in the market and usually very cooperative for DTF pressing. They sit right in the middle: more forgiving than pure polyester, but you still want to stay slightly below full cotton settings.
300°F for 12 seconds is the sweet spot for most cotton-poly blends. This temperature is hot enough to bond the adhesive fully without risking dye migration from the synthetic component. If the polyester percentage is high (70%+), inch closer to the polyester settings — around 290°F.
Nylon Settings
Nylon is the most heat-sensitive common garment fabric — it can scorch, melt, or deform at temperatures that cotton handles easily. When pressing DTF transfers onto nylon (think: athletic shorts, windbreakers, nylon bags, or jackets), use 275°F and just 8–10 seconds with light-to-medium pressure.
Cold peel is strongly recommended for nylon — let the transfer cool completely before removing the film. This reduces stress on the adhesive bond while the garment is still vulnerable from the heat.
Always test on a sample piece of the same fabric first. Nylon comes in many weaves and weights, and each one behaves slightly differently under heat. A few seconds of testing can save an entire production run.
For a full breakdown of how DTF performs across different fabric types — including tips for tricky materials like ribbed knit and canvas — check out our DTF supplies page for pressing accessories that make fabric-specific work easier.
Troubleshooting Common Issues
Even with the right settings, things sometimes don't go as planned. Here's how to diagnose and fix the most common DTF heat press problems:
| Problem | Likely Cause | Fix |
|---|---|---|
| Transfer not sticking / lifting edges | Temperature too low, time too short, or insufficient pressure. Moisture in fabric. | Pre-press the garment for 3–5 seconds to remove moisture. Increase temp by 5°F or add 2–3 seconds. Check pressure — you should feel firm resistance when pressing. |
| Color shifting / dye migration | Temperature too high for the fabric, especially polyester. Synthetic dyes bleeding into transfer. | Reduce temperature by 10–15°F. For polyester, stay at 285°F or lower. Use a bleed-blocking sheet between the fabric and platen. |
| Cracking or peeling after first few washes | Under-pressed (insufficient temperature, time, or pressure). Transfer not fully bonded to fabric fibers. | Increase press time by 2–3 seconds. Confirm pressure is medium-firm. Add an optional second press at same settings after peeling. Check that wash care instructions are correct (inside-out, cold water, no high-heat drying). |
| Peeling edges / corners lifting immediately | Pressure uneven across the platen, or the transfer shifted during pressing. | Check platen leveling — use a pressure gauge if available. Use heat-resistant tape on transfer corners. Ensure cover sheet is flat and fully covering the design before closing the press. |
| Scorching / fabric discoloration | Temperature too high, especially on polyester or nylon. Press time too long. | Reduce temperature by 15–20°F and reduce press time. Always use a cover sheet. For delicate fabrics, consider pressing from the inside of the garment. |
| Shiny or plasticky finish on the print | Second press done directly on the transfer without a cover sheet, or excess heat on the adhesive layer. | Always use a parchment or silicone cover sheet for the second press. Reduce second-press time to 5 seconds. |
General Rule
When troubleshooting, change only one variable at a time. If you increase temperature and pressure and change your peel method all at once, you won't know what actually fixed — or created — the problem. Adjust one setting, press a test piece, evaluate, then adjust the next.
Still having issues after running through these fixes? Our team is here to help. Reach out via our contact page and we can walk through your specific setup. We've seen pretty much every heat press scenario and are happy to troubleshoot with you — that's part of what we do here at Zizo DTF.
Frequently Asked Questions
What temperature do you heat press DTF transfers?
The standard temperature for heat pressing DTF transfers is 300–320°F (149–160°C). For cotton specifically, 315°F is the sweet spot. If you're pressing polyester, drop down to 285°F to avoid dye migration and fabric damage. For nylon, go even lower — around 275°F. When in doubt, start on the lower end and test on a scrap piece before pressing your final garment.
How long do you press DTF transfers?
Press time depends on your fabric. As a general guide: cotton needs 15 seconds, cotton-poly blends need 12 seconds, polyester needs 10 seconds, and nylon needs 8–10 seconds. Always use a timer. Guessing your press time — even by a few seconds — is one of the most common causes of under-bonded or scorched transfers.
Do you hot peel or cold peel DTF transfers?
Most DTF transfers are hot peel — you remove the backing film immediately after pressing while the transfer is still warm. Some are cold peel, where you wait 15–20 seconds before peeling. The instructions with your transfers will specify which method to use. If you're unsure, test on a scrap piece: if the film peels cleanly and the design stays fully adhered, you've got the right approach. If the design pulls with the film, let it cool and try again.
Can you use a regular iron for DTF transfers?
We don't recommend it. A regular household iron heats unevenly — the center of the soleplate is always hotter than the edges — and it can't maintain consistent pressure across the transfer surface. The result is partial adhesion: some areas bond while others don't, leading to peeling edges and premature failure. Even an entry-level clamshell heat press ($200–$400) will deliver dramatically better results than an iron. If you're doing DTF regularly, it's one of the best investments you can make.
Why is my DTF transfer not sticking?
The most common causes are: temperature too low, press time too short, insufficient pressure, or moisture in the fabric. Start with a pre-press (3–5 seconds at 300°F) to remove fabric moisture before applying the transfer. Then check your settings — if you're below 300°F or under 12 seconds on a cotton garment, the adhesive may not be fully activating. Increase temperature by 5°F or add 2–3 seconds and test again. If the transfer partially sticks but edges lift, your pressure may be uneven — check that your platen is level. Still having problems? Our DTF supplies page has pressing accessories that can help.
Wrapping Up
Heat pressing DTF transfers is genuinely one of the easier decorating techniques once you have the settings dialed in for your specific fabric. The core process is always the same: pre-press to remove moisture, position carefully, cover with parchment, press at the right temperature and time for your fabric, and peel correctly. Four steps, and you've got a professional-quality print.
The fabric-specific settings table in this guide is your reference — bookmark it. The most critical rule to remember: lower your temperature and time for polyester and nylon. Getting that wrong is the source of probably 80% of heat press frustrations we hear about.
Feel free to experiment once you've got the basics down. Every heat press, every fabric, and every design is slightly different. The decorators who get the best results are the ones who keep notes on what works for their specific setup and refine from there.
Here at Zizo DTF, we print all of our transfers at our Schaumburg, Illinois facility — and we include application guidance with every order. If you ever have a question about pressing our specific transfers, our team is a quick message away.
Not Sure Which Transfers to Order?
Try our free sample pack — printed on real production equipment, shipped to your door, no commitment. Proof is in the pressing.
Get Your Free Sample PackExplore DTF gang sheets for multi-design projects